


Pseudo-SASS Array
Posted by Tom Benedict on 03/09/2015
Following the successful testing of the new mics, I turned my attention toward building a pseudo SASS array. My prototype design was a copy of a copy of a copy of… well… a copy. This becomes important later, because it’s lessons learned from one of those copies that drove part of my final design. First, a bit of history, mostly gleaned from Vicki Powys’s web site:
The SASS, or Stereo Ambient Sampling System, was designed by Michael Billingsley in 1987 for Crown International. It was (and still is) aimed at recording music performances, audiences, and other subjects that lend themselves to stereo recording. It offers relatively strong stereo separation in a small package. Crown sold the SASS with microphones built into the system, which worked well for its intended purpose. But the original microphones exhibited a high noise floor, and weren’t well suited for quiet subjects. Lang Elliott and Michael Billingsley modified a Crown SASS to work with higher-end microphones, and Walter Knapp took that concept and offered re-tooled Crown SASS units that would take, among other mics, the Sennheiser MKH20. This made it a viable choice for recording quiet ambient sounds and field recording.
More variations tailored to field recording continue to be made. Rob Danielson’s PBB2N, built out of wood and PVC pipe along similar lines to the Crown SASS, takes the same range of microphones as the units made by Walter Knapp, and offers better bass response. Vicki Powys, concerned about the weight of a wood array, took that concept and made her own version out of dense closed-cell foam (pool floaties) using Primo BT-EM172 capusles. After building her foam SASS, she did side-by-side tests with it against a Crown SASS with MKH20 microphones. The performance of the two were remarkably close.
The idea behind the Crown SASS, Rob Danielson’s PBB2N, and Vicki Powys’s SASS-LN2, is to baffle the microphones so that the array acts as a pseudo-binaural stereo pair similar to the human head. The wings act as boundary surfaces, and the foam baffle in the center partially absorbs sound from unwanted angles. The end result is a higher gain than a bare microphone, and considerably better separation than two microphones arranged as an X-Y pair. This photo of a Crown Audio SASS-P MkII was a later model that used PZM mics, but the overall shape didn’t really change much from the original SASS:

I built my prototype based off of measurements I took from a photo of an original Crown SASS, scaled to the overall size of Vicki Powys’s SASS-LN2. I wanted to test the idea before leaping in and building an airborne unit, so I built the prototype out of 1/2″ foam core board. The unit provided quite good stereo separation, and had considerably higher gain than the built-in mics on the Tascam DR-05, but it lacked bass punch. I wanted to figure out why before going from prototype to final design.
One clue came from another of Rob Danielson’s designs: PBMB2. His design calls for significantly larger wings than the original Crown SASS. The larger wings provide a larger boundary surface for the microphones to work with, and therefore provide gain at lower frequencies than the original from Crown. Since I’m planning to use this in the air, cross-section is an important design consideration I need to take into account: larger objects are more easily affected by the wind than smaller ones. Rather than using the larger wings from Rob Danielson’s PBB2N array, I stuck with the dimensions of the Crown SASS.
Another clue came from a set of posts on the micbuilders Yahoo group: Electrets mics need to be mounted flush with the end of their enclosures. Mine aren’t. They’re recessed several millimeters into their tubes and hide behind a layer of stainless mesh. Recessing the mics this way colors the sound they pick up.
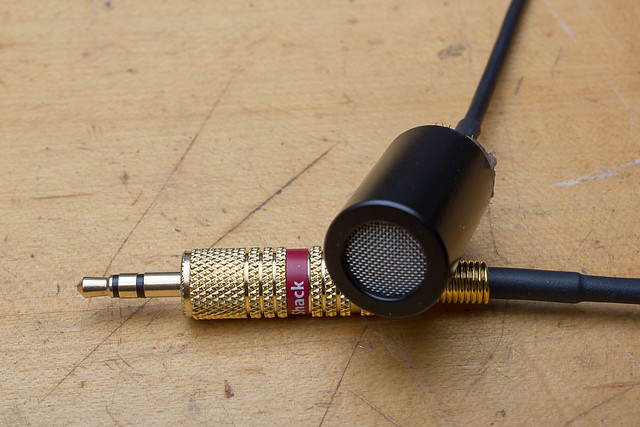
Unfortunately I learned this late in the game, after I’d already built all five of my mic enclosures as well as my airborne pseudo-SASS. Before going out and designing all new enclosures I decided to test this for myself. I disassembled one of my mics and tried sliding the mic deeper into the tube. I found that the more recessed it was, the more mid-range gain I got, and the less bass. Finally I pulled it out entirely, bare to the world, and tried it that way. I could easily tell the difference. There was a lot more bass, and the mic sounded a lot less tinny. (Hey, if I can tell the difference, it’s HUGE!) Time to design all new mic enclosures!
The last clue came from the folks at DIY Boundary Mics. They ran some tests on the array built by Vicki Powys and the modified Crown SASS with Sennheiser MKH20 microphones. Rob D. (Rob Danielson?) from DIY Boundary Mics noted that Vicki’s foam array lacked some of the lower frequency response the Crown SASS / MKH20 combination had. He attributed it to the soft nature of the boundary surface (foam). Paul Jacobson at DIY Boundary Mics ran a comparison between Vicki Powys’s array and a similar one made of untreated wood, similar to Rob Danielson’s array. The untreated wood array recovered some of the bass lost in the foam array. This agrees with Rob D’s conclusions about the hardness of the boundary surface.
Which leads me back to the prototype I built out of foam core. The outer surface of the foam core is relatively hard, but the foam itself is acoustically thin, and the foam core board has a high natural frequency. I’m guessing that some of the lack of bass punch in my prototype can be traced to the material I used to build the array and the lack of damping material in the array’s inner cavity. I needed something better.
Years ago I made a kite aerial 4×5 film camera out of birch plywood. I never was completely happy with the photos it produced, but it turned out super pretty. Since Rob Danielson was making boundary array mics out of wood, and since the wood SASS had better bass performance than Vicki’s foam one, I figured I could build mine out of wood as well.
I already had some 0.200″ baltic birch plywood left over from the 4×5 camera, so that’s what I used for the array body. The woodwork came together relatively quickly, but I couldn’t finish sealing up the box until I had the damping material glued in place. Here’s one problem with living on an island: no one sells acoustic materials. Rob Danielson used carpet padding in his PBB2N, so I went that route. Here’s another problem with living on an island: stores that sell carpet padding don’t like breaking up rolls! I finally wound up at Home Depot. I waited patiently in the flooring department until someone could help me. I’d already been to several stores, and had received more than my fair share of blank stares when I asked for one foot of carpet padding. I wasn’t expecting much.
The folks at Home Depot surprised me! When I asked for such a small amount, the guy in flooring said, “You building a speaker box or something?” “A microphone array, actually, but it’s the same idea.” “Cool!” He was super helpful, and sent me home with my one foot roll.
Eventually my DIY-SASS came together. It’s shown here with my original mic enclosures, but in the next few weeks I’m planning to swap them out with flush mounts:
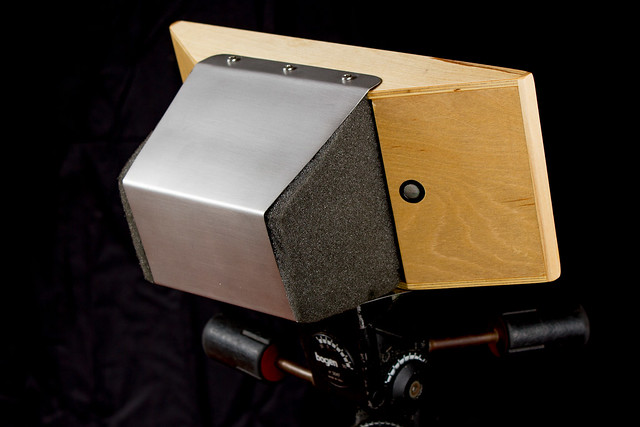
It uses the same Primo BT-EM172 capsules as Vicki Powys’s array, though she used four and I only used two. The covering for the baffle gave me fits until I finally bent to common wisdom and used sheet metal. (I’d wanted to make it out of the same plywood I’d used for the rest of the SASS for cosmetic reasons, but I ran into structural issues.) The hardware store sold 6″x12″ aluminum for almost the same cost as 6″x12″ polished stainless, so I went with the stainless. But I had to bead blast the outside of it to keep myself from going blind when I took it out in the sun.
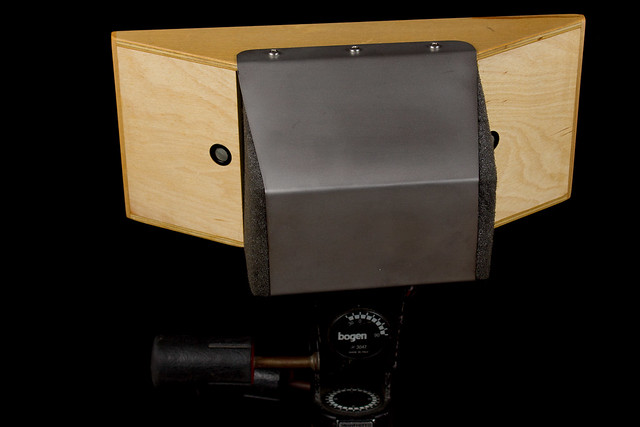
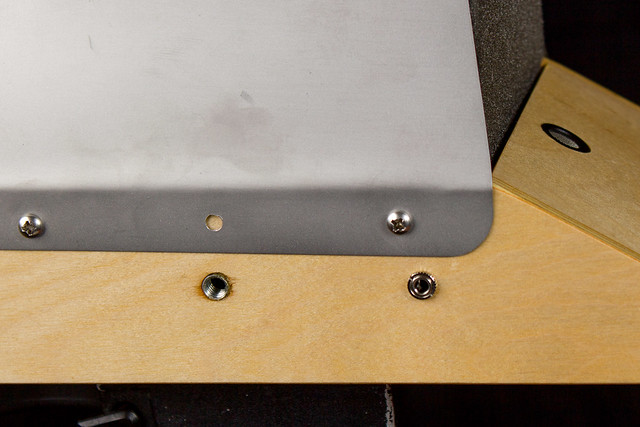
There are a lot of screw holes on this, both to hold the baffle cover in place and to attach the array to a tripod (or a KAS rig!) I’ve seen too many wood screws strip out over time, so I epoxied T-nuts into each screw hole to provide machine threads. Since I do a lot of my KAP along the coast and plan to record sound in that environment as well, I went with as much stainless hardware as I could. Even so, I’m going to have to open the unit periodically to check the wiring for salt contamination. (One more reason to be glad I used T-nuts!)
Since I’m planning to use this on the ground as well as in the air I didn’t want to wire in a dedicated cable. I’ll only need 2-3′ for aerial work, but on the ground there’s good reason to put some distance between a microphone and the recordist. Having a way to swap cables seemed like a good idea, so I wired it with a 1/8″ TRS jack so I can use the cable of choice, depending on what I’m doing.
I’ve now used my pseudo-SASS in the field several times. I was pleased to find that the heavier construction worked, and that I got back a lot of the bass punch I’d lost with the foam core prototype array. I’m looking forward to trying it with the flush mounted microphone enclosures to see how much more bass I can recover.
Meanwhile I’m facing yet another design problem. Like any microphone, my pseudo-SASS array suffers from wind noise. I learned this the hard way while trying to record the sound of waves crashing on rocks.
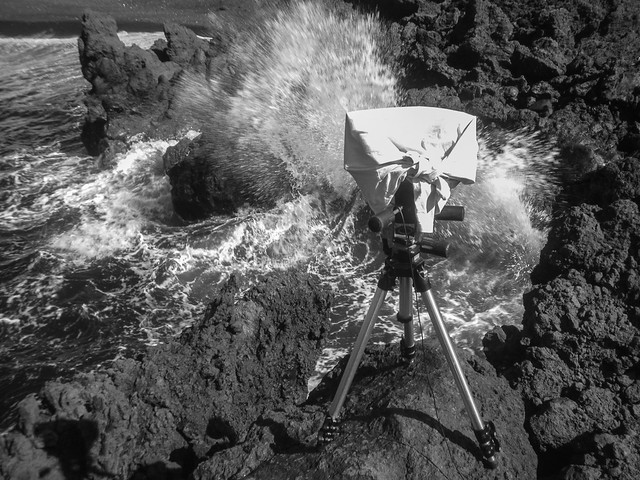
The wind buffeting was more than the mics could handle, so I wrapped the whole thing with my folded up t-shirt. Even that wasn’t enough to cut the wind, so none of the files were usable. Bummer!
Unfortunately the wind there was nothing compared to the wind I’ll get when I hang this thing from a kite line. And since Rycote and Rode don’t make windjammers for DIY mic projects I’ll have to build my own. My last act of the weekend was to order a yard of 2″ pile 100% polyester artificial fur with the loosest backing I could find. As I finished checking out I couldn’t help thinking yet again, “You’re getting in deep, man.” I fear I’ll learn how to sew fake fur before I learn how to make my own kites.
– Tom

Andrew Newton said
Awesome read Tom. Love your work, more please.
Tom Benedict said
More on the way! I’ve been hemming and hawing about how to re-mount the mic capsules. For the SASS, at least, I have an inelegant but workable solution. I’m still on the fence on the other three mics I’ve built. But I hope to have the SASS mics re-built tonight. New pictures!
Flush Mount Mic Bodies « The View Up Here said
[…] « Pseudo-SASS Array […]