The View Up Here

Random scribblings about kites, photography, machining, and anything else

  • Flickr Gallery

Posts Tagged ‘CHDK’

Challenging but Rewarding

Posted by Tom Benedict on 17/11/2010

I recently had a pair of flights that yielded really nice results.  The first was done just on a whim.  In the past I’ve flown at Mala`ai, the culinary garden at Waimea Middle School in Kamuela, Hawaii.  I like flying there for a number of reasons.  It’s a pleasant place to fly with no ground hazards or obstructions, it’s a great place to try out new ideas for orthoimaging, it’s an interesting subject, and the school uses the images to help plan future work in the garden.  One of the coolest things about the garden is that it’s largely the students who do the planning and the work.  And boy do they ever move FAST!  I’ve never photographed it twice and seen the same thing.  It’s constantly changing.

But almost every time I’ve flown there, I’ve underestimated the size of the place!  The field of view on my camera’s lens is such that the field of view on the ground in the horizontal direction is almost exactly the same as its altitude.  This helps me compose shots when doing orthoimaging.  But vertically the field of view is smaller, and in the past I’ve clipped.  This time was going to be different!  I’d fly high enough to get the whole thing in one shot!

And in the end I did:

Mala`ai - The Culinary Garden at Waimea Middle School - 11 November, 2010

This is still a composite image because I wanted to be able to rotate it to line it up better with the edges of the frame.  But there are no stitch errors inside the garden that needed attention.  The garden itself came from a single image.  As soon as I’d processed the image I let the folks at the garden know there was a new image to download.

About a week and a half ago I got a call to ask if I could photograph the Anuenue Playground in Kamuela, as well.  I’ve wanted to photograph the playground for years, but there are a number of ground hazards and obstructions that have made it less than ideal.  Even though the adjoining football/baseball field doesn’t have lights any more, the poles that used to support them are still there.  There are large trees near the park.  It’s bordered on two sides by busy roadways.  And worst of all the park is full of kids!  I have never had a rig fall off my kite line, but that doesn’t mean I don’t believe it can.  So a great deal of additional paranoia was called for.

I surveyed the place a couple of times that week, trying to find a good angle to launch and approach the park.  But depending on the direction of the wind I could add above ground high voltage power lines to the list of ground hazards.  No thank you!  It looked like the only reasonably safe approach was for the wind to blow out of the west-northwest, and for it to be super-steady.  I didn’t even bother to call back to let them know.  I felt like a failure.

Two days after I made the garden picture, I checked the wind models.  Lo and behold, the afternoon called for soft and steady winds out of the west-northwest!  Sure ’nuff, by 2:00pm the winds had shifted and the conditions were ideal.  I waited out an event that was happening in the football field, my chosen launch spot, but by 3:30pm the coast was clear.  I put up my Fled, put my camera in my ortho rig, and got it in position.

There’s one other piece of KAP gear that figures prominently into this session: my son.  I knew I’d never spot it on my own, so I asked him to grab his walkie talkies and come with me to the park.  He got on the radio and guided me in, and I checked my apparent altitude against the footprint of the park on the ground to make sure I had the field of view to get everything.

I came close.  There’s one apparatus in the park that didn’t make it into the photo set, but the rest of the park did:

Anuenue Park, Waimea

I didn’t get enough overlap for a clean crop, but it covered the bulk of the park with reasonably sharp detail.  A quick pass through PTLens to take out barrel distortion and a small amount of tilt, and then a pass through ICE to make the composite, and the image was done.

All in all the camera was in the air for only 14 minutes, taking pictures every five seconds.  The resulting set of images offered a rich selection to work from.  I feel confident that as the restoration work on the park progresses, I’ll be able to return and make additional documentation photos for them.

Can’t beat a good day.

– Tom

Posted in Hawaii, Kite, Kite Aerial Photography, Photography, Weather | Tagged: , , , , , , , , | Leave a Comment »

A KAP Outing that Wasn’t

Posted by Tom Benedict on 22/11/2009

Since finishing the Worldwide KAP Week 2009 Book, I’ve had more time to do photography, and to at least attempt to do KAP.  Last weekend I got out of the house for a few hours to do some KAP up on Mana Road, a dirt track that runs from Waimea to Mauna Kea’s Summit Road on the south side of the mountain.  The weather in Waimea was rainy, and my plan was to keep driving up Mana Road until I came out above the clouds.  This worked out better than I thought, and I eventually got to do some KAP at a large water shed.

The Water Shed

The photo received some positive comments when I posted it on Flickr, including one from someone who said how much they enjoyed seeing pictures of Hawaii that don’t appear in the tourist literature.  In looking through the photography I’ve done, I realized a good percentage of it has been done at beaches, or in places that are stereotypically tropical Hawaii.  I hate getting stuck in a rut, so the comment on the water shed photo was timely.  Exactly the kind of direction I need!

Yesterday my wife took my daughters to dance, so my son and I threw our stuff in my Jeep and headed out.  My plan was to hike out to some remote kipukas on the slopes of Mauna Loa and try my hand at KAP there.  The wind was favorable, but as it turns out the weather wasn’t.

A kipuka is a forested cinder cone that has been surrounded by fresh lava.  This cuts off the kipuka from the surrounding area, making it a pocket ecology.  Kipukas are common wherever there are cinder cones out on a relatively flat area near an active volcano.  The saddle between Mauna Loa and Mauna Kea has dozens of kipukas that host native Hawaiian flora, and numerous endemic Hawaiian birds.  My son packed binoculars to do some bird watching, and I packed my KAP gear.

By the time we got to the turn off to Mauna Kea Summit Road, it was obvious our plans had to change.  A line of clouds was blowing through the saddle between Mauna Kea and Mauna Loa, and already the area we were planning to hike was covered by clouds.  Rather than turn around and call it a loss, we pulled in at Puu Huluhulu, a large kipuka situated at the turn off to Summit Road.  My son and I have hiked this area frequently, and it’s a favorite of ours.  I had some level of hope that we could reach the top before the clouds rolled through, and that I could get a kite and camera airborne before things socked in.  But the clouds moved faster than we did.  By the time we got to the top everything was an opaque mass of white.  My kites stayed in my bag, but my camera didn’t.  A day that’s bad for kite aerial photography is often a good day for ground photography.  The most obvious subject to work with was the twisted trees that grow on Puu Huluhulu.  It’s trees like this that originally inspired the art of bonsai.

Misty Trees

But there were a number of other subjects that also drew my eye.  Completely overcast skies often make for poor landscapes, but they make for great macro photography.  This plant is about as big as my palm, though the adult plants grow much larger.

Fuzzy Plant

When the clouds and the wet and the cold finally got to be too much, my son and I hiked back to my Jeep.  The misty photography and macro photography felt good, but I was still disappointed that we were packing it in and turning around.  But then I remembered just how close the far end of Mana Road was.  Even better, Mana Road does lead back to Waimea.  It’s not the smoothest ride home, but it was a chance to keep the day from ending before it had really started.  I asked, my son said yes, so we headed out Mana Road.

Stream Bed Panorama

Not too far in we ran across a really picturesque stream bed.  The water wasn’t running, which was a little surprising given the amount of rain the area had received recently, but we were fairly high up so things had probably drained well before we got there.  The clouds that had made KAP at Puu Huluhulu impossible had cleared the air between Mauna Kea and Puu Oo, one of the two active vents on Kilauea.  The two steam plumes from Puu Oo and from the lava flow entering the sea near Kalapana were both clearly visible.  I set up my tripod and lined things up to make a panorama.  When I metered the sky and the ground, however, I found I couldn’t get both the foreground and the steam plumes in the same shot.  The sky was just too bright, and the overcast sky made the foreground too dark.  So I wound up shooting it as an HDR panorama.  It wasn’t quite the look I was after, but it served to balance the two strongest elements in the frame.

Pools

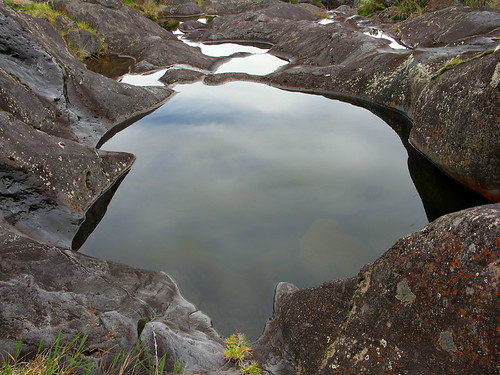
By the time I’d finished the panorama, my son had hiked up slope to a really pretty tree.  Rather than follow, I hiked down the stream bed until I reached the pools I’d spotted while photographing the panorama.  The overcast sky made for nice reflections, so I arranged things for a low angle shot that would pick that up.

Lichen

The same soft light that made for good close-up photography on Puu Huluhulu also made for nice macro photography here.  Some recent experiments at work using CombineZP made me want to try the technique in the field.  The idea is to take pictures at a range of focuses, and use CombineZP to take the sharpest part of each shot and combine them into a single image with infinite apparent depth of field.  I don’t know how enamored I would be of this if I didn’t have CHDK running on my A650.  One of my favorite scripts is a bracketing script that will bracket whatever your last control setting was.  I use it to do HDR photography, but it can also be used for CombineZP.  The A650 can be set to do manual focus, so once MF is selected, the bracketing script can be set up to rack focus through a nice wide range, taking pictures along the way.  I set this to do 37 focus positions, shifting by 3 clicks in focus each time.  (The A650 has well over a hundred focus positions, so techniques like this are quite straightforward.)  When I got home I put the files into CombineZP, and got this in return.

Nene

A few miles down the road my son spotted nene off to one side.  I stopped and got out, with some faint hope of photographing them.  Unfortunately the A650 doesn’t have much in the way of long focal length in its zoom range.  I’ve tried several times to photograph nene with my 20D, but light, weather, or the patience of the birds has always thwarted my attempts.  I was overjoyed to find these geese to be very patient with me.  They let me get quite close without reacting much at all.  I was happy to walk away with a couple of good photographs of them.

Nene

Mana Road is miles and miles of beautiful scenery that changes every time you go around a bend.  I’ve been out on it several times, and each time there is something different to photograph.  I still haven’t figured out quite how I’d like to photograph the koa forest the road winds through, so that’s still one I have to return to once I have a clear idea in mind.  Just past the koa forest, though, the road became quite muddy.  At one point the road dropped away entirely, and I was looking out past my Jeep’s hood into space.

I’m sure there are those who would give a loud “WHOOP!” and hit the gas, but I’m not one of those.  I hit my brakes, turned off the engine, and got out to look.  I saw a muddy slope with about a 25% grade, maybe 40′ high, and covered in skid marks.  I wasn’t keen on the idea of driving it, but of course I had to photograph it!

Whoops!

The wind was too gusty to get a stable kite shot, so I opted for my 20′ carbon fiber pole.  This is a converted breem pole I picked up for $20 and stuck a ball head on for photographic work.  Setting up the shot took about as much time as setting up a tripod, and the CHDK intervalometer script meant I didn’t need to remotely trigger the camera.  All that was required was a little patience waiting for the “click!” sounds coming from the camera, and lining things up between shots.

The Watershed

After photographing my Jeep and the slippery slope, I wound up backing out and going down the lower road.  This avoided the inevitable skid, and got us back on track.  A little further down the road we came across a water shed.  This is smaller than the water shed I’d photographed the previous week, but being closer to the road it offered more opportunities for close photography.  These water sheds are essentially large catchment systems used to collect rainwater for the cattle that graze in the surrounding fields.  The roof of the shed has gutters that are piped into the tanks.  When it rains (which it does quite frequently) the rainwater runs off the roof, through the pipes, and into the tanks.  The water in the tanks is then diverted to troughs for the cattle to use.

The Watershed

I’ve driven past this water shed several times, and have made numerous attempts to photograph it.  But I’ve been disappointed with the results.  I know the picture I’m after, but I just never managed to get it.  This time I got close.

Ideally I’d have liked to be about five to six feet to the right, and aimed the camera more to the left.  Unfortunately there’s a barbed wire fence in the way that makes that angle painful, if not impossible.  I’m still working out how to get the shot I’m after, but this one worked out better than the others I’ve tried.

I did finally get a kite airborne once.  I was on the leeward side of a stand of trees, so the air was minimal and tossy at the ground, and blowing like a freight train higher up.  Kite handling was rough, heavy, and not fun at all.  I clipped on my KAP rig and tried to do some photography of a water tank that’s managed by the water department.  With the wind through the trees and the altitude of the rig, I couldn’t hear the shutter whenever I told it to take a picture.  So it was no surprise when I got home and saw that the only picture I had from the one KAP session of the day was a picture of my feet when I tested the shutter on the ground.

Ah well…

So it was the KAP outing that wasn’t, but I still had a good time.

– Tom

Posted in Kite Aerial Photography, Photography | Tagged: , , , , , , , , , , , , | Leave a Comment »

Kiholo Bay Inlet

Posted by Tom Benedict on 07/06/2009

Worldwide KAP Week is over for 2009, but KAP is a year-round activity for me.  The past six months we’ve been plagued with volcanic gasses coming out of the Halemaumau Crater on Kilauea, but a few days ago the tradewinds came back, blew the volcanic plume out to sea, and for the weekend, at least, our sweeping panoramic views were back.  It was a tough call whether to do ground-based photography or to fly a camera, but in the end the kites won.

Unfortunately because we’d had such uncharacteristic wind for such an uncharacteristically long time, the wind models I rely on to decide where to fly were reporting bogus information.  The models predicted 6-8 knot kona winds at my house, whereas I could look outside and clearly see it was blowing 10-12 knot tradewinds.  When technology fails, the eyeball prevails.  I packed my gear and my son and drove down to the coast.

In addition to editing the book for Worldwide KAP Week 2009 and starting work for a book of my own, I’ve also started making some KAP posters.  But in order to print them at the size I would like, I’ve been faced with the resolution limit of my photography.  I’ve been getting my posters printed using the El-Co Color Labs Internet Special.  They use a Durst Theta printer, and print on Fuji papers using Fuji chemistry.  A quick word about digital printing:  There are two basic ways to make a digital print.  One is to use a transfered medium, like a dye sublimation process, or an inkjet process.  The other is to take a photographic paper and to expose it to light.  Each has its own advantages, but I like the second for the bulk of the photo work I do.  The Durst Theta printers expose photographic paper to light, and then develop the paper the same way a film-based photo lab would.  The result truly is a photographic print.

But resolution is the key.  The Durst Theta can print at up to 254 dpi.  At 24×30″ that’s an image 6096×7620 pixels, or a 44 megapixel image.  I’ve made prints at resolutions as low as 150 dpi on a Durst Theta printer, but I prefer not to go below 200 dpi.  For this set of posters 200 dpi is my lowest resolution.  This is still a huge image, and the bulk of the pictures I have on file simply aren’t up to the task.

This has driven me to re-visit sites where I’ve been able to make good photos, but without the resolution necessary to print.  So I was overjoyed when driving down the coast to find that the wind at Kiholo Bay was a nice 7.4 knot on-shore.  Perfect.

Kiholo Bay has a fantastic reef, and is an outstanding place to do snorkeling and SCUBA.  There’s a good dirt road that will take you all the way to the water’s edge, so there’s no great hardship to get there.  It’s a popular spot, but not so overcrowded as, say, Hapuna Beach.  But if you’re willing to go a little further and work a little harder, Kiholo Bay has a feature that’s not to be found anywhere else in the Islands: the inlet at Kiholo Bay.

Wainanali`i Pond

There are two approaches to the inlet.  One is around the water’s edge from the park at Kiholo Bay.  The other is to park off the side of the highway, a little more than half a mile away.  The walk across the lava is not bad, but it’s not a traditional trail.  The “trail” is a series of paint splotches on the rocks to tell you vaguely where to go.  But the ground is rough lava.  It’s more than possible to get hurt, and this time I did.  I twisted my ankle.

A Study in Salinity

What makes the inlet special is that it’s a relatively deep patch of water with a very shallow mouth connecting it to the sea.  The level of the pond rises and falls with the tides, but tidal flow causes very little mixing of the water inside the pond.  As a result it is highly stratified, with seawater salinity levels at the surface, and high salinity levels further down.  The salinity at the bottom of the pond can easily be double that at the surface.  Select euryhaline organisms inhabit the higher salinity levels, turning the water its characteristic opaque aquamarine blue, whereas the surface water is all crystal clear.

The shallow mouth and opaque water in the inlet make it the perfect habitat for honu, or Pacific green sea turtles.  The pond is relatively free of predators, so the honu are able to forage in some measure of peace and security.

Flying Solo

The honu swim in the high salinity waters at the bottom of the pond, moving like phantoms through mist.  Every once in a while one will come to the surface for air, slipping into the clear waters above and then descending once more into the obscuring depths.

The arm of land that cuts the inlet off from the sea is mostly composed of rounded rocks rather than the hard lava flow that makes up the opposite shore.  This provides a good spot for honu to come up out of the water to rest and sun themselves.  Honu are protected by law, so people are not supposed to approach or touch them. A 20′ minimum distance is required, but I try to maintain at least 40′ between me and a honu on land.  With the low traffic of humans at the inlet, and the lack of predators, this provides a wonderful spot to study them.

A Study in Turtles

Hawaii Preparatory Academy (HPA) maintains a remote observation station at the Kiholo Bay Inlet.  The station has had some upgrades since my last visit, and now sports three PV panels, a fixed mount infrared camera, a fixed mount visible camera, a pan tilt zoom camera, and an RF link back to Waimea.  To learn more about this installation and the research program, you can visit:  HPA/NOAA Sea Turtle Research and Conservation Program.

But for me, the Kiholo Bay Inlet is simply a beautiful place that I have the privilege of being able to see and photograph.  It’s not the easiest place to get to, and there’s no fresh water or shade to speak of.  But Kiholo Bay isn’t here for us, it’s here for the honu.  I just feel fortunate I get to visit from time to time.

Idyllic

Tom

(Note:  I have been calling the Kiholo Bay Inlet by the wrong name: Wainanalii Pond.  This is how it is commonly labeled on maps, hence my mistake.  But during a conversation with Bobby Camara, he pointed out that the village of Wainanalii is a two hour canoe ride to the north of Kiholo Bay, and that it was destroyed by the same lava flow that created the inlet.)

Posted in Hawaii, Kite Aerial Photography, Photography | Tagged: , , , , , , , , , , , | 1 Comment »

Mechanics of KAP

Posted by Tom Benedict on 28/05/2009

On the off-chance that my previous post sparked some interest in doing kite aerial photography, I’ll go into the mechanics of actually hanging a camera from a kite line, and convincing it to do what the photographer wants.  The approach used can be anything from quite simple to otherworldly complex.  A lot depends on what the photographer actually needs, but even more depends on what the photographer is convinced they want.  It’s important to keep these two ideas separate when you look at hanging a camera from a kite line.

Lightweight Rig - Ready to Fly

By far the simplest KAP rig I use is one I designed spedifically for doing mapping.  It was built for one specific trip, but it’s such a versatile rig I’ve used it numerous times since.  The requierments of the trip drove the design:  For starters, there is very little wind at the site, so lifting a heavy KAP rig was out of the question.  The bulk of the weight in this rig is the camera itself.  The rig’s weight is almost negligible.  For the purpose of mapping, all the pictures needed to be as orthogonal as possible, so there is no provision to tilt or pan the camera.  And we would need to take pictures over the course of several hours with no opportunities to change batteries during the flight, so battery life was of paramount importance.

There is no provision for the photographer to tell the camera when to take a picture.  Instead the camera is running CHDK, a toolkit that runs on top of the camera’s native firmware.  In this case CHDK was running an intervalometer script that let the camera take pictures every five seconds without any user intervention.  No mechanical linkages, no servos, no fancy electronics, just the camera itself running a pre-canned program.

Lightweight Rig Airborne

In the end the rig performed marvellously.  Complete with camera and the four AA batteries the camera requires, the rig came in just over 450g.  It flew on one set of batteries for two straight days, and took more than 2,000 photographs.  The photos from that trip are being used to map an archaeological site, and will be used in papers that should be published in the next year or so.

Current Rig - Late 2008

At the other extreme is my radio controlled KAP rig.  It’s built almost entirely out of off-the-shelf parts from Brooxes, the main supplier of commercial KAP equipment. The rig allows the photographer to pan and tilt the camera, and to operate the shutter.  Brooxes sells other components that would allow the camera to rotate from horizontal to vertical, and other accessories exist that allow the photographer additional control over the camera itself.

The rig started off as a Brooxes BBKK, but over the course of a few years I added a carbon fiber leg kit, gear reduction for the pan axis, a set of PeKaBe blocks for the suspension, and a number of other improvements.  Two changes have been made since this photograph was taken:  The first was to replace the aging 72MHz AM radio with a 2.4GHz Turborix.  The second was to remove the shutter servo and replace it with a GentLED-CHDK.  Unfortunately I haven’t photographed this rig since the changes were made.

The GentLED-CHDK is one of the cooler pieces of hardware I’ve bought for my rig.  It is a smart cable that plugs into the RC receiver on one end, and the camera’s USB port on the other.  When the photographer flips the shutter control on the RC transmitter (in my case I set it up as a switch rather than a joystick), the GentLED-CHDK sends +5V down the USB cable to the camera.  One of the features of CHDK is that you can monitor the +5V line on the USB port and take action when the camera sees it.  In my case I run a script on my camera that says as long as +5V is being applied, behave as if the shutter button is being held down.  In single-shot mode, this means each time I flip the switch the camera will take a picture.  In continuous shutter mode this means that I can hold down the switch on the transmitter and the camera will keep taking pictures as fast as it can, roughly every 1.1 second.

The two rigs are as different as they could be and still get the job done.  One was the product of a few hours of thinking and about an hour’s worth of time in the shop.  Total expenditure was maybe $50 for the Picavet suspension, most of that being the PeKaBe blocks.  The bulk of the rig came out of the scrap box.  The other was the product of a few years of tinkering with a commercial rig.  Total expenditure is probably several hundred dollars by now, but still probably less than a good carbon fiber tripod and professional ball head.

What is important to take away from this is that there is no one right way to hang a camera from a kite line.  And depending on what you actually need, an extremely simple rig like the ortho mapping rig may get the job done just as well as a more complicated, heavier rig like the BBKK.  Before becoming discouraged at the prospect of designing and building a rig from scratch, consider the commercial options.  And before becoming discouraged by the cost of the commercial kits, consider the possibility of simplifying your requirements and making one yourself.

It’s possible for anyone to do aerial photography.  If you want to do it, do it.

— Tom

Posted in Kite Aerial Photography, Photography | Tagged: , , , , , , , , , | Leave a Comment »